The Guide to Laravel Email Queue Jobs
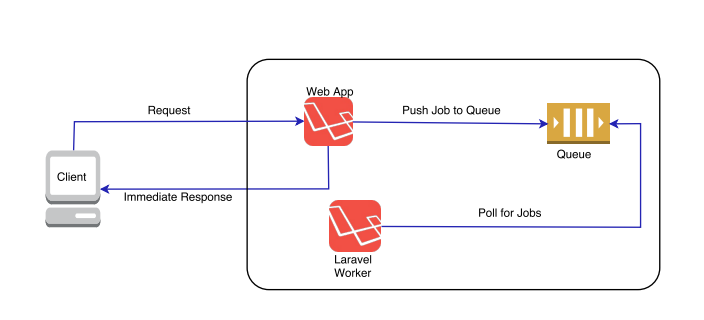
Queuing is an actionable feature in Laravel. It allows you to dispatch the processing of particular tasks until a later time. Anything that would benefit from rate-limiting can be put on a queue. In this tutorial, however, we’ll focus on email queues. So, open your Laravel app project and explore how to create queues for email sending.
What is the benefit of sending emails with queues in Laravel?
The main benefit of queues is to speed up processing. This, in turn, contributes to a better user experience. Email queuing is extremely efficient when you are dealing with large amounts of emails. Under the hood, it has an asynchronous system that puts emails on a queue before they reach the mail server. The emails are processed in batches. SMTP servers also have a built-in queue management system, but it’s less refined than queuing emails right in the app.
If you don’t know whether you need to set up an email queue in your Laravel app, consider the following:
-
Are you up to sending email notifications to over 1K of users – queuing will let you accelerate this task?
-
Do you have a data limit for email sending and do not want to run over it? Queuing will send as many emails as needed to meet the specified limit
-
Are you sending over 10K transactional or bulk emails every day?
There are many other cases that reveal the efficiency of queuing. So, let’s find out how to set up email queues in Laravel.
Setting up an email queue
A regular queue in Laravel consists of a job, a logic for the task you want to run, and a worker that runs the job. All the data about queues configuration is stored in config/queue.php. Also, this file contains connection configurations for each queue driver. Connections may have several assigned queues. This can be useful for apps that need to prioritize or segment jobs processing. In Laravel, you can specify the priority of queues to be processed by the worker. Here is an example of running a worker that gives a higher processing priority to a queue:
php artisan queue:work --queue=high,default
In our case, the task is email sending. So, before we can create a job for it, we need to build an email and set up configuration for sending it.
Creating and configuring an email
You can find a detailed tutorial on how to send emails in Laravel in our dedicated blog post. In brief, we need to accomplish three steps:
-
Configure the SMTP server settings
-
Create a Mailable class and modify the generated template
-
Create the email body
Configure the SMTP server settings
Open the .env file and specify the SMTP server settings that will be used for email sending. Laravel uses Mailtrap.io as a default server. The benefit of this is that the email sent from the app are trapped by the server and end up in the Mailtrap inbox. So, you won’t spam real users while your app is still in development phase. Here are the Mailtrap settings in .env:
MAIL_MAILER=smtp
MAIL_HOST=smtp.mailtrap.io
MAIL_PORT=2525
MAIL_USERNAME=1a2b3c4d5e6f7g //your username generated by Mailtrap
MAIL_PASSWORD=1a2b3c4d5e6f7g // your password generated by Mailtrap
MAIL_FROM_ADDRESS=from@example.com
MAIL_FROM_NAME=Example
In most cases, .env configuration is enough. If you need more control over the configuration, you can also edit the config/mail.php file with the above credentials.
Create a Mailable class and modify the generated template
Execute
php artisan make:mail EmailForQueuing
This creates an app/Mail/EmailForQueuing.php file that you can modify according to your values like sender, subject, and so on. For example:
<?php

namespace App\Mail;

use Illuminate\Bus\Queueable;
use Illuminate\Mail\Mailable;
use Illuminate\Queue\SerializesModels;
use Illuminate\Contracts\Queue\ShouldQueue;

class EmailForQueuing extends Mailable
{
    use Queueable, SerializesModels;

    /**
     * Create a new message instance.
     *
     * @return void
     */
    public function __construct()
    {

    }

    /**
     * Build the message.
     *
     * @return $this
     */
    public function build()
    {
        return $this->from('mail@example.com', 'Mailtrap')
            ->subject('Test Queued Email')
            ->view('mails.email');
    }
}
Create the email body
And the last step is dedicated to the email template. We will use a Blade template. Create a new folder resources/views/mails and a file in it. Let’s call it email.blade.php. We’ll use a simple template as an example:
<!DOCTYPE html>
<html>
<head>
    <title>Laravel Mail Queue Tutorial</title>
</head>
<body>
    @component('mail::message')

        New Fruit Details

        Fruit ID:
        Fruit Name:

        Fruit Company
    @endcomponent
<p>Hello! This is a test email.</p>
</body>
</html>
Our email is ready for being queued!
Laravel mail queue configuration
Setting up the queue driver
To implement queuing in Laravel, you can choose from a variety of queue backends available in config/queue.php. Those include Amazon SQS, Beanstalkd (do not confuse it with AWS Elastic Beanstalk), Redis, and others. Also, you may consider a synchronous driver for immediate execution of jobs (for local use) and a null queue driver that discards queued jobs. A database driver is, however, a traditional way of setting up queues and the option we’re going to explore below.
So, the first thing we need to do is create a Laravel mail queue database to hold the jobs. For this, run the following commands one by one:
php artisan queue:table # creates a table for queued jobs

php artisan migrate # migrates the table
After that, tweak the .env file with the following line to tell Laravel that the database driver will be used for queuing:
QUEUE_CONNECTION=database
NB: In order to use other drivers, you need to install dependencies for your Laravel version and configure a certain database in config/database.php.
Creating a job class
The Artisan command make:job generates a new job and the app/Jobs directory in which all the queued jobs will be stored. So, let’s create a job called SendEmail as follows:
php artisan make:job SendEmail
Now we have a job class for which we need to implement the email sending logic using the handle() method. Let’s use a simple logic like a queue job to send an email notification to each new subscriber. For this, we create a new instance of SendEmail and use the Mail facade for sending.
<?php

namespace App\Jobs;

use Illuminate\Bus\Queueable;
use Illuminate\Queue\SerializesModels;
use Illuminate\Queue\InteractsWithQueue;
use Illuminate\Contracts\Queue\ShouldQueue;
use Illuminate\Foundation\Bus\Dispatchable;
use App\Mail\EmailForQueuing;
use Mail;

class SendEmail implements ShouldQueue
{
    use Dispatchable, InteractsWithQueue, Queueable, SerializesModels;

    protected $details;

    /**
     * Create a new job instance.
     *
     * @return void
     */
    public function __construct($details)
    {
        $this->details = $details;
    }

    /**
     * Execute the job.
     *
     * @return void
     */
    public function handle()
    {
        $email = new EmailForQueuing();
        Mail::to($this->details['email'])->send($email);
    }
}
By the way, if you’re interested in sending email notifications in Laravel, welcome to our dedicated tutorial.
Dispatching a job class
Once you’ve defined a job class, you can dispatch or delay the job using the appropriate method. For this, you need to specify the arguments within the job constructor via the dispatch method. For example, let’s dispatch the SendEmail job within a hypothetical controller that sends email notification to each new subscriber:
namespace App\Http\Controllers;

use Illuminate\Http\Request;

use App\Jobs\SendEmail;

use App\Http\Controllers\Controller;

class JobController extends Controller
{

    /**
     *
     *
     * @param Request $request
     * @return \Illuminate\Http\RedirectResponse
     * @throws \Symfony\Component\HttpKernel\Exception\HttpException
     */
    public function enqueue(Request $request)
    {
         $details = ['email' => 'recipient@example.com'];
         SendEmail::dispatch($details);
    }

}
Delayed and synchronous dispatching
When dispatching a queued job, you can delay its execution using the delay method. For example, here is how the delay of email sending for five minutes may look:
namespace App\Http\Controllers;

use Carbon\Carbon;
use Illuminate\Http\Request;
use App\Jobs\SendEmail;
use App\Http\Controllers\Controller;

class JobController extends Controller
{
    /**
     * Enqueue jobs
     */
    public function enqueue(Request $request)
    {
        $details = ['email' => 'recipient@example.com'];
        $emailJob = (new      SendEmail($details))->delay(Carbon::now()->addMinutes(5));
        dispatch($emailJob);
    }
}
If your goal is to dispatch a job immediately (synchronously), there is the dispatchNow method for this. In this case, the job won’t be queued but will be executed immediately. For example:
namespace App\Http\Controllers;


use Illuminate\Http\Request;


use App\Jobs\SendEmail;

use App\Http\Controllers\Controller;

class JobController extends Controller
{

    /**
     *
     *
     * @param Request $request
     * @return \Illuminate\Http\RedirectResponse
     * @throws \Symfony\Component\HttpKernel\Exception\HttpException
     */
    public function enqueue(Request $request)
    {
         $details = ['email' => 'recipient@example.com'];
         SendEmail::dispatchNow($details);
    }

}
How you can customize the queue and connection
Job chaining
You can use the withChain method to set up a queued job chain. The chain consists of a primary job to be run in the first place and secondary jobs to be run in sequence after the completion of the primary one. For example:
SendEmail::withChain([
    new VerificationEmail,
    new WelcomeEmail
])->dispatch();
Dispatching to a particular queue/connection
You can push your job to different queues using the onQueue method when dispatching:
SendEmail::dispatch($details)->onQueue('processing');
In this case, jobs will be pushed to specific queues within a single connection. If there is a need to specify a connection, use the onConnection method when dispatching:
SendEmail::dispatch($details)->onConnection(sqs);
Both chaining methods also can be used together like this:
SendEmail::dispatch($details)
              ->onConnection('sqs')
              ->onQueue('processing');
Max attempts and timeout value for the job class
In Laravel, you can specify the maximum attempts and timeout (in seconds) for the job using switches on the Artisan command:
php artisan queue:work --tries=5
php artisan queue:work --timeout=20
Also, there is an alternative way of defining these parameters right on the job class:
<?php

namespace App\Jobs;

class SendEmail implements ShouldQueue
{
    /**
     * The number of times the job may be attempted.
     *
     * @var int
     */
    public $tries = 5;
}
{
    /**
     * The number of seconds the job can run before timing out.
     *
     * @var int
     */
    public $timeout = 20;
}
Bonus: Rate limiting (for Redis driver only)
Apps with the Redis backend can use the throttle method for queuing jobs by time or concurrency. This means a job can be run a specific number of times within a specific period. Here is an example of rate limiting a job to run 5 times every 30 seconds:
Redis::throttle('key')->allow(5)->every(30)->then(function () {
    // Job logic...
}, function () {
    // Could not obtain lock...

    return $this->release(5);
});
That’s it for playing with job customization. Now, let’s make it run.
Running the queue worker
Before you can run the worker with an Artisan command, you need to set up a route in routes/web.php:
Route::get('test-email', 'JobController@enqueue');
In the end, you can run the worker as follows:
php artisan queue:worker
The command will continue to run until you stop it manually or close the terminal.
Queue worker options and alternatives
| Command | Description |
|---|---|
| nohup php artisan queue:work & | The job will work after the terminal is closed |
| php artisan queue:listen | Alternative to queue:work that lets you watch the queue process and you don’t have to manually restart the worker after code changes. |
| php artisan queue:restart | Restarts all workers |
| php artisan queue:work <connection name> | Runs a particular queue connection for the worker. Use the queue:work command assigned to the connection defined in config/queue.php. For example: php artisan queue:work redis |
| php artisan queue:work <connection name> –queue=<queue name> | Runs a particular queue for the connection. For example: php artisan queue:work redis –queue=emails |
| php artisan queue:work <connection name> –tries=<number of attempts> | Runs the connection according to the specified maximum number of attempts. For example: php artisan queue:work redis –tries=5 |
| php artisan queue:work <connection name> –tries=<number of attempts> –delay=<seconds> | Runs the connection according to the specified maximum number of attempts. The –delay option specifies the time (in seconds) to wait before retrying a job that has failed. For example: php artisan queue:work redis –tries=5 –delay=5 |
| php artisan queue:work –once | Processes a single job from the queue |
| php artisan queue:work –stop-when-empty | Processes all the jobs from the queue and stops when they’re done |
| php artisan queue:work –timeout=<seconds> | Runs the job and kills off a child queue worker after the specified time limit. For example: php artisan queue:work –timeout=60 |
| php artisan queue:work –sleep=<seconds> | If no new jobs available, the worker will not process any new jobs within a specified time limit (in seconds). For example: php artisan queue:work –sleep=3 |
Testing email queues in Laravel
We use Mailtrap as the SMTP server for the app, therefore we have a powerful engine for testing right at the heart. All you have to do is run the worker and check whether your queued emails are in the Mailtrap Demo inbox.
If your emails have not ended up the Demo inbox, let’s do some troubleshooting.
How to deal with queued jobs that failed?
All failed queued jobs get into the failed_jobs database table. You need to create a migration for it as follows:
php artisan queue:failed-table

php artisan migrate
The queue:failed Artisan command allows you to view data about the jobs that have got into the table – job ID, connection, queue, and failure time. To retry all the failed jobs, run:
php artisan queue:retry all
To remove a failed job, use the queue:forget command attached with the job number like as follows:
php artisan queue:forget 3
And the queue:flush command will remove all the failed jobs.
To wrap up
Our guide may seem a long-read, but each code snippet is worth mentioning to clarify things. We’re glad to help you gain insight into email queues in Laravel. Also, we encourage you to take a deeper look at the Mailtrap blog for other email-centered articles. And many more are to come.