
Notes of Laravel Documentation
Blade
Note that views which extend a Blade layout simply override sections from the layout.
Content of the layout can be included in a child view using the @parent directive in a section”.
So, if you already have a @section defined in the master layout, it will be overriden unless you specify @parent inside the child layout’s @section.
But for @yield, it always gets the section from the child layout.
That means it always overrides the @yield part, even if it has a default defined as @yield(‘section’, ‘Default Content’) .
Contrary to the previous example, this sidebar section ends with @endsection instead of @show. The @endsection directive will only define a section while @show will define and immediately yield the section.
Difference between @yield and @include
@yield and @include look very similar and they serve almost the same purpose. Let’s see what are the differences between these two. We use @yield to define a section in a layout. You can define what should be placed in the section with @section when you extend the layout to other pages with @extend. The layout you define will contain the header, footer, head, body of HTML.
<body>
     @yield('content')
</body>
@include is used like a PHP include. It is used for HTML that will be used again. It imports content of a different file into the file we want at the location in which it is placed.
Example of @include:
<div>
    @include('include.file_name') // "include." indicates the subdirectory that the file is in.
</div>
The included view will inherit all data available in the parent view, you may also pass an array of extra data to the included view:
@include('view.name', ['some' => 'data'])
@includeIf('view.name', ['some' => 'data'])
@includeWhen($boolean, 'view.name', ['some' => 'data'])
@includeUnless($boolean, 'view.name', ['some' => 'data'])
@includeFirst(['custom.admin', 'admin'], ['some' => 'data'])
You should avoid using the __DIR__ and __FILE__ constants in your Blade views, since they will refer to the location of the cached, compiled view.
Displaying Unescaped Data
Blade statements are automatically sent through PHP’s htmlspecialchars function to prevent XSS attacks.
By default, Blade statements are automatically sent through PHP’s htmlspecialchars function to prevent XSS attacks. If you do not want your data to be escaped, you may use the following syntax:
Hello, {!! $name !!}.
Be very careful when echoing content that is supplied by users of your application. Always use the escaped, double curly brace syntax to prevent XSS attacks when displaying user supplied data.
@json directive
Use @json instead of json_encode.
<script>
    var app = @json($array);

    var app = @json($array, JSON_PRETTY_PRINT);
</script>
You should only use the @json directive to render existing variables as JSON. The Blade templating is based on regular expressions and attempts to pass a complex expression to the directive may cause unexpected failures.
@verbatim directive
If you are displaying JavaScript variables in a large portion of your template, you may wrap the HTML in the @verbatim directive so that you do not have to prefix each Blade echo statement with an @ symbol:
@verbatim
    <div class="container">
        Hello, .
    </div>
@endverbatim
Laravel Request
Creating Form Requests
php artisan make:request StoreBlogPost
The generated class will be placed in the app/Http/Requests directory. If this directory does not exist, it will be created when you run the make:request command. Let’s add a few validation rules to the rules method:
/**
 * Get the validation rules that apply to the request.
 *
 * @return array
 */
public function rules()
{
    return [
        'title' => 'required|unique:posts|max:255',
        'body' => 'required',
    ];
}
Authorizing Form Requests
The form request class also contains an authorize method. Within this method, you may check if the authenticated user actually has the authority to update a given resource. For example, you may determine if a user actually owns a blog comment they are attempting to update:
/**
 * Determine if the user is authorized to make this request.
 *
 * @return bool
 */
public function authorize()
{
    $comment = Comment::find($this->route('comment'));

    return $comment && $this->user()->can('update', $comment);
}
Customizing The Error Messages
You may customize the error messages used by the form request by overriding the messages method. This method should return an array of attribute / rule pairs and their corresponding error messages:
/**
 * Get the error messages for the defined validation rules.
 *
 * @return array
 */
public function messages()
{
    return [
        'title.required' => 'A title is required',
        'body.required'  => 'A message is required',
    ];
}
Customizing The Validation Attributes
If you would like the :attribute portion of your validation message to be replaced with a custom attribute name, you may specify the custom names by overriding the attributes method. This method should return an array of attribute / name pairs:
/**
 * Get custom attributes for validator errors.
 *
 * @return array
 */
public function attributes()
{
    return [
        'email' => 'email address',
    ];
}
Prepare Input For Validation
If you need to sanitize any data from the request before you apply your validation rules, you can use the prepareForValidation method:
use Illuminate\Support\Str;

/**
 * Prepare the data for validation.
 *
 * @return void
 */
protected function prepareForValidation()
{
    $this->merge([
        'slug' => Str::slug($this->slug),
    ]);
}
Laravel Log
Channels
Laravel Monolog uses a concept called channels. The channels are the different places where you can send your logs. For the rest of the config/logging.php, the config file returns an associative array with two main keys — default and channels.
Drivers
With Laravel 5.6 and above, we have brand new drivers supporting a wider range of logging outputs. The old drivers are still available under the values “single,” “daily,” “errorlog,” and “syslog.” Now we have new values for new kinds of logging outputs. Some commonly used new drivers include:
Stack
This simply means you can stack multiple logging channels together. When you use the “stack” driver, you need to set an array of values for other channels under the key “channels.” See Fig 4 for the example of a stack driver in use.
Slack
This lets you send logs to the popular social channel, Slack. When you use this driver, you need to configure the URL as well. Optional Slack-related variables include username and emoji. This driver essentially allows you to output the log to a specific Slack channel.
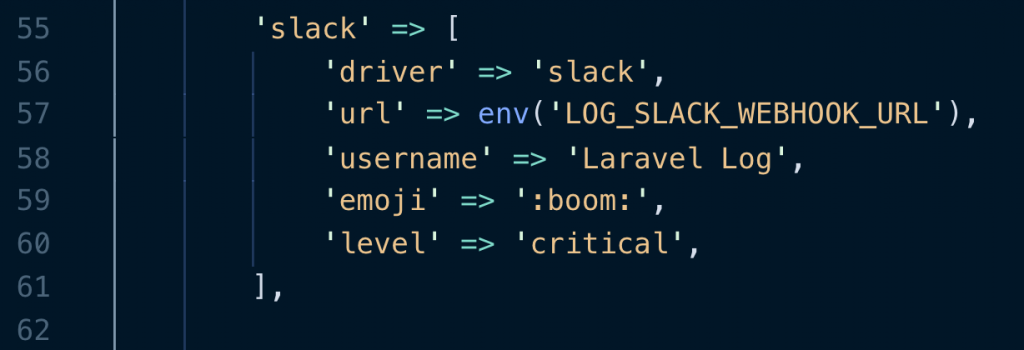 Slack logging channel configuration
Monolog
It’s a bit weird to see Monolog show up again, this time as its own driver. The point to remember is that when you want to use Monolog’s native handlers, then you want to use the Monolog driver. Thankfully, the default logging config file provides two examples of using two different Monolog handlers.
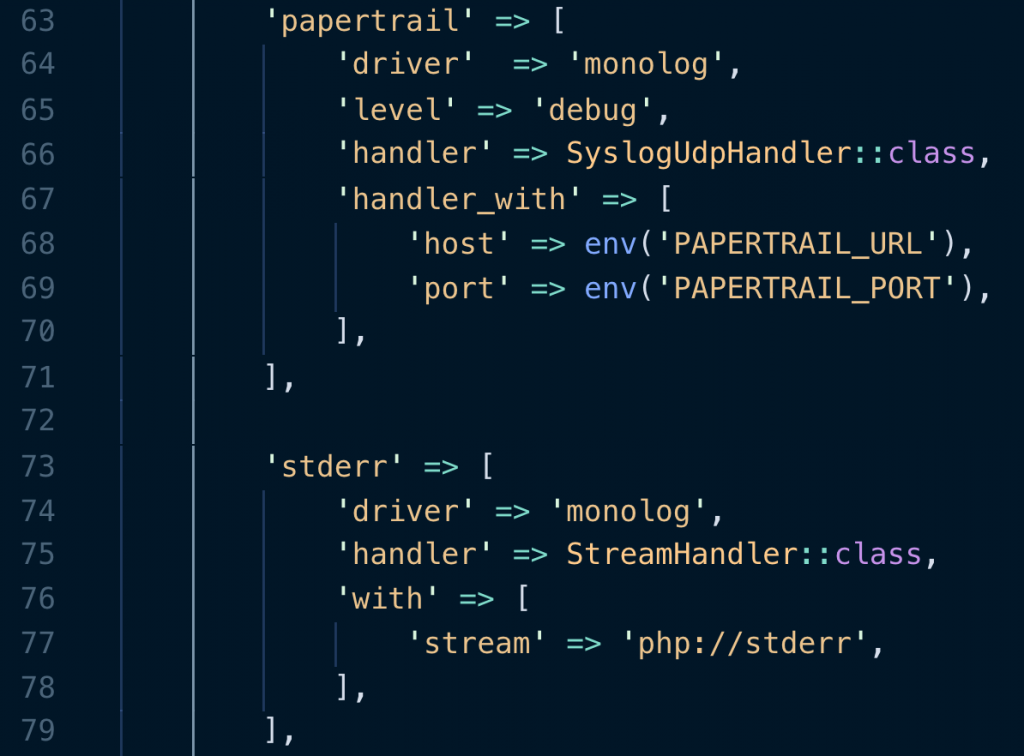 Monolog logging channel configuration
Custom
There’s only a small write-up about this in the official Laravel documentation. Between the popular legacy drivers and the various Monolog handlers, it’s pretty hard to imagine someone writing up their own custom channel driver. Nevertheless, if that’s something you want to do, you can. Usually, a custom channel is for you to write logs to third-party services, like Apache Kafka and Logstash.
Driver List
| Driver | Description |
|---|---|
| stack | For creating “multi-channel” channels. |
| single | For single-file or path-based logger channels. Uses Monolog’s StreamHandler. |
| daily | For daily logs. Uses Monolog’s RotatingFileHandler. |
| slack | For sending to Slack channels. Uses Monolog’s SlackWebhookHandler. |
| syslog | For sending to the system log. Uses Monolog’s SyslogHandler. |
| errorlog | For sending to the web server’s error log. Uses Monolog’s ErrorLogHandler. |
| monolog | For using any other of Monolog’s supported handlers. |
| custom | A driver calling a specified factory to create a channel for a third-party service. |
Laravel Logs Levels List
- Log::emergency($message): It is used when the system is unusable;
- Log::alert($message): Immediate action should be exercised. This should trigger some alerts and wake you up during night time;
- Log::critical($message): Critical status. Example: System component is not available;
- Log::error($message): Error status, where something is wrong and needs your immediate action;
- Log::warning($message): Warning status, where you should take an action before it will become an error;
- Log::notice($message): Handles normal events, but with more important events;
- Log::info($message): Handles normal events. Example: SQL logs;
- Log::debug($message): Detailed debugging information;