Notes of Json Web Token (JWT)
What is JSON Web Token?
JSON Web Token (JWT) is an open standard (RFC 7519) that defines a compact and self-contained way for securely transmitting information between parties as a JSON object. This information can be verified and trusted because it is digitally signed. JWTs can be signed using a secret (with the HMAC algorithm) or a public/private key pair using RSA or ECDSA.
Although JWTs can be encrypted to also provide secrecy between parties, we will focus on signed tokens. Signed tokens can verify the integrity of the claims contained within it, while encrypted tokens hide those claims from other parties. When tokens are signed using public/private key pairs, the signature also certifies that only the party holding the private key is the one that signed it.
When should you use JSON Web Tokens?
Here are some scenarios where JSON Web Tokens are useful:
-
Authorization: This is the most common scenario for using JWT. Once the user is logged in, each subsequent request will include the JWT, allowing the user to access routes, services, and resources that are permitted with that token. Single Sign On is a feature that widely uses JWT nowadays, because of its small overhead and its ability to be easily used across different domains.
-
Information Exchange: JSON Web Tokens are a good way of securely transmitting information between parties. Because JWTs can be signed—for example, using public/private key pairs—you can be sure the senders are who they say they are. Additionally, as the signature is calculated using the header and the payload, you can also verify that the content hasn’t been tampered with.
What is the JSON Web Token structure?
In its compact form, JSON Web Tokens consist of three parts separated by dots (.), which are:
-
Header
-
Payload
-
Signature
Therefore, a JWT typically looks like the following.
xxxxx.yyyyy.zzzzz
Let’s break down the different parts.
Header
The header typically consists of two parts: the type of the token, which is JWT, and the signing algorithm being used, such as HMAC SHA256 or RSA.
For a JWT object, the members of the JSON object represented by the JOSE Header describe the cryptographic operations applied to the JWT and optionally, additional properties of the JWT. Depending upon whether the JWT is a JWS or JWE, the corresponding rules for the JOSE Header values apply.
This specification further specifies the use of the following Header Parameters in both the cases where the JWT is a JWS and where it is a JWE.
-
“typ” (Type) Header Parameter
-
“cty” (Content Type) Header Parameter
For example:
{
  "alg": "HS256",
  "typ": "JWT"
}
Then, this JSON is Base64Url encoded to form the first part of the JWT.
Payload
The second part of the token is the payload, which contains the claims. Claims are statements about an entity (typically, the user) and additional data. There are three types of claims: registered, public, and private claims.
- Registered claims: These are a set of predefined claims which are not mandatory but recommended, to provide a set of useful, interoperable claims. Some of them are: iss (issuer), exp (expiration time), sub (subject), aud (audience), and others.
Notice that the claim names are only three characters long as JWT is meant to be compact.
-
“iss” (Issuer) Claim
-
“sub” (Subject) Claim
-
“aud” (Audience) Claim
-
“exp” (Expiration Time) Claim
-
“nbf” (Not Before) Claim - The nbf (not before) claim identifies the time before which the JWT MUST NOT be accepted for processing.
-
“iat” (Issued At) Claim
-
“jti” (JWT ID) Claim - The jti (JWT ID) claim provides a unique identifier for the JWT. The identifier value MUST be assigned in a manner that ensures that there is a negligible probability that the same value will be accidentally assigned to a different data object; if the application uses multiple issuers, collisions MUST be prevented among values produced by different issuers as well. The jti claim can be used to prevent the JWT from being replayed. The jti value is a case-sensitive string. Use of this claim is OPTIONAL.
{
    "iss": "s6BhdRkqt3",
    "aud": "https://server.example.com",
    "response_type": "code id_token",
    "client_id": "s6BhdRkqt3",
    "redirect_uri": "https://client.example.org/cb",
    "scope": "openid",
    "state": "af0ifjsldkj",
    "nonce": "n-0S6_WzA2Mj",
    "max_age": 86400
}
-
Public claims: These can be defined at will by those using JWTs. But to avoid collisions they should be defined in the IANA JSON Web Token Registry or be defined as a URI that contains a collision resistant namespace.
-
Private claims: These are the custom claims created to share information between parties that agree on using them and are neither registered or public claims.
An example payload could be:
{
  "sub": "1234567890",
  "name": "John Doe",
  "admin": true
}
The payload is then Base64Url encoded to form the second part of the JSON Web Token.
o note that for signed tokens this information, though protected against tampering, is readable by anyone. Do not put secret information in the payload or header elements of a JWT unless it is encrypted.
Signature
To create the signature part you have to take the encoded header, the encoded payload, a secret, the algorithm specified in the header, and sign that.
For example if you want to use the HMAC SHA256 algorithm, the signature will be created in the following way:
HMACSHA256(
    base64UrlEncode(header) + "." +
    base64UrlEncode(payload),
    secret)
The signature is used to verify the message wasn’t changed along the way, and, in the case of tokens signed with a private key, it can also verify that the sender of the JWT is who it says it is.
Putting all together
The output is three Base64-URL strings separated by dots that can be easily passed in HTML and HTTP environments, while being more compact when compared to XML-based standards such as SAML.
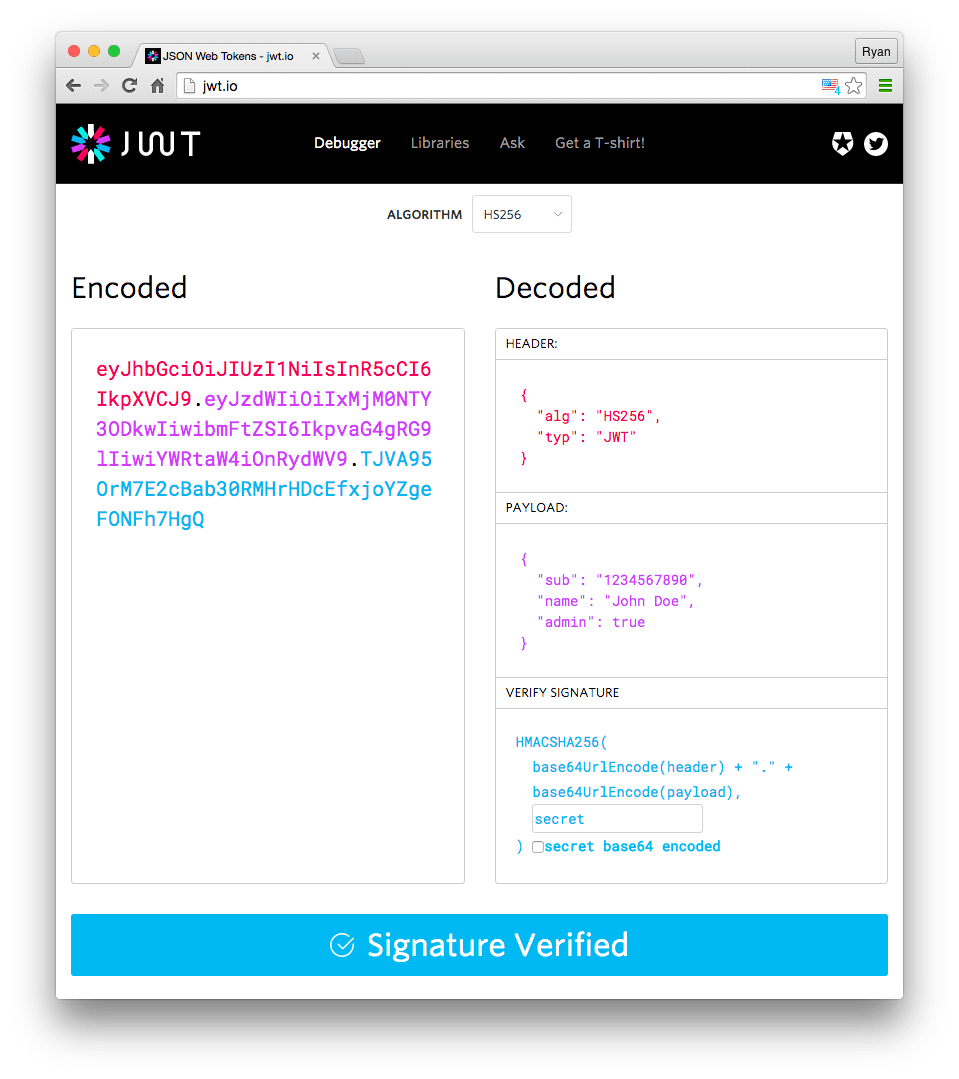
The following shows a JWT that has the previous header and payload encoded, and it is signed with a secret.

If you want to play with JWT and put these concepts into practice, you can use jwt.io Debugger to decode, verify, and generate JWTs.
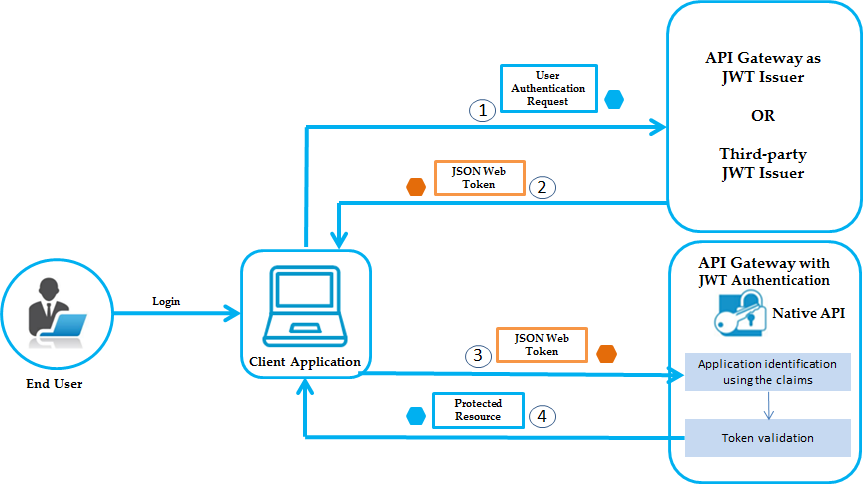
How do JSON Web Tokens work?
In authentication, when the user successfully logs in using their credentials, a JSON Web Token will be returned. Since tokens are credentials, great care must be taken to prevent security issues. In general, you should not keep tokens longer than required.
You also should not store sensitive session data in browser storage due to lack of security.
Whenever the user wants to access a protected route or resource, the user agent should send the JWT, typically in the Authorization header using the Bearer schema. The content of the header should look like the following:
Authorization: Bearer <token>
This can be, in certain cases, a stateless authorization mechanism. The server’s protected routes will check for a valid JWT in the Authorization header, and if it’s present, the user will be allowed to access protected resources. If the JWT contains the necessary data, the need to query the database for certain operations may be reduced, though this may not always be the case.
If the token is sent in the Authorization header, Cross-Origin Resource Sharing (CORS) won’t be an issue as it doesn’t use cookies.
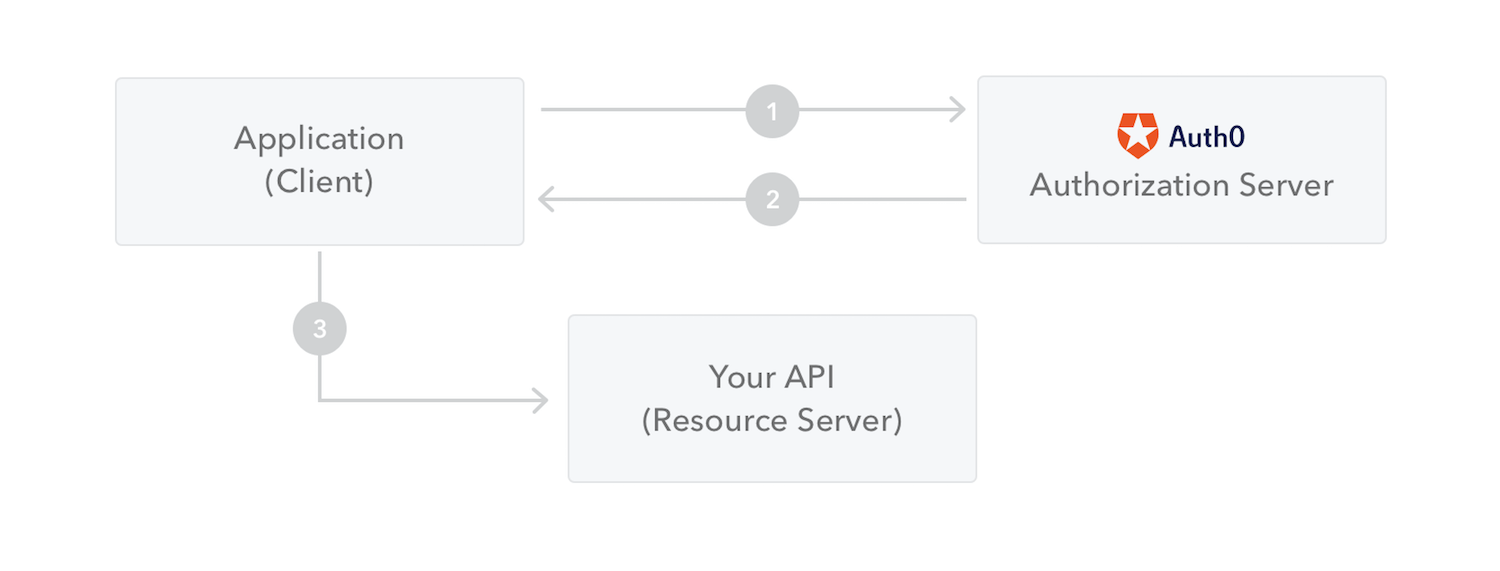
The following diagram shows how a JWT is obtained and used to access APIs or resources:
-
The application or client requests authorization to the authorization server. This is performed through one of the different authorization flows. For example, a typical OpenID Connect compliant web application will go through the /oauth/authorize endpoint using the authorization code flow.
-
When the authorization is granted, the authorization server returns an access token to the application.
-
The application uses the access token to access a protected resource (like an API).
Do note that with signed tokens, all the information contained within the token is exposed to users or other parties, even though they are unable to change it. This means you should not put secret information within the token.
Why should we use JSON Web Tokens?
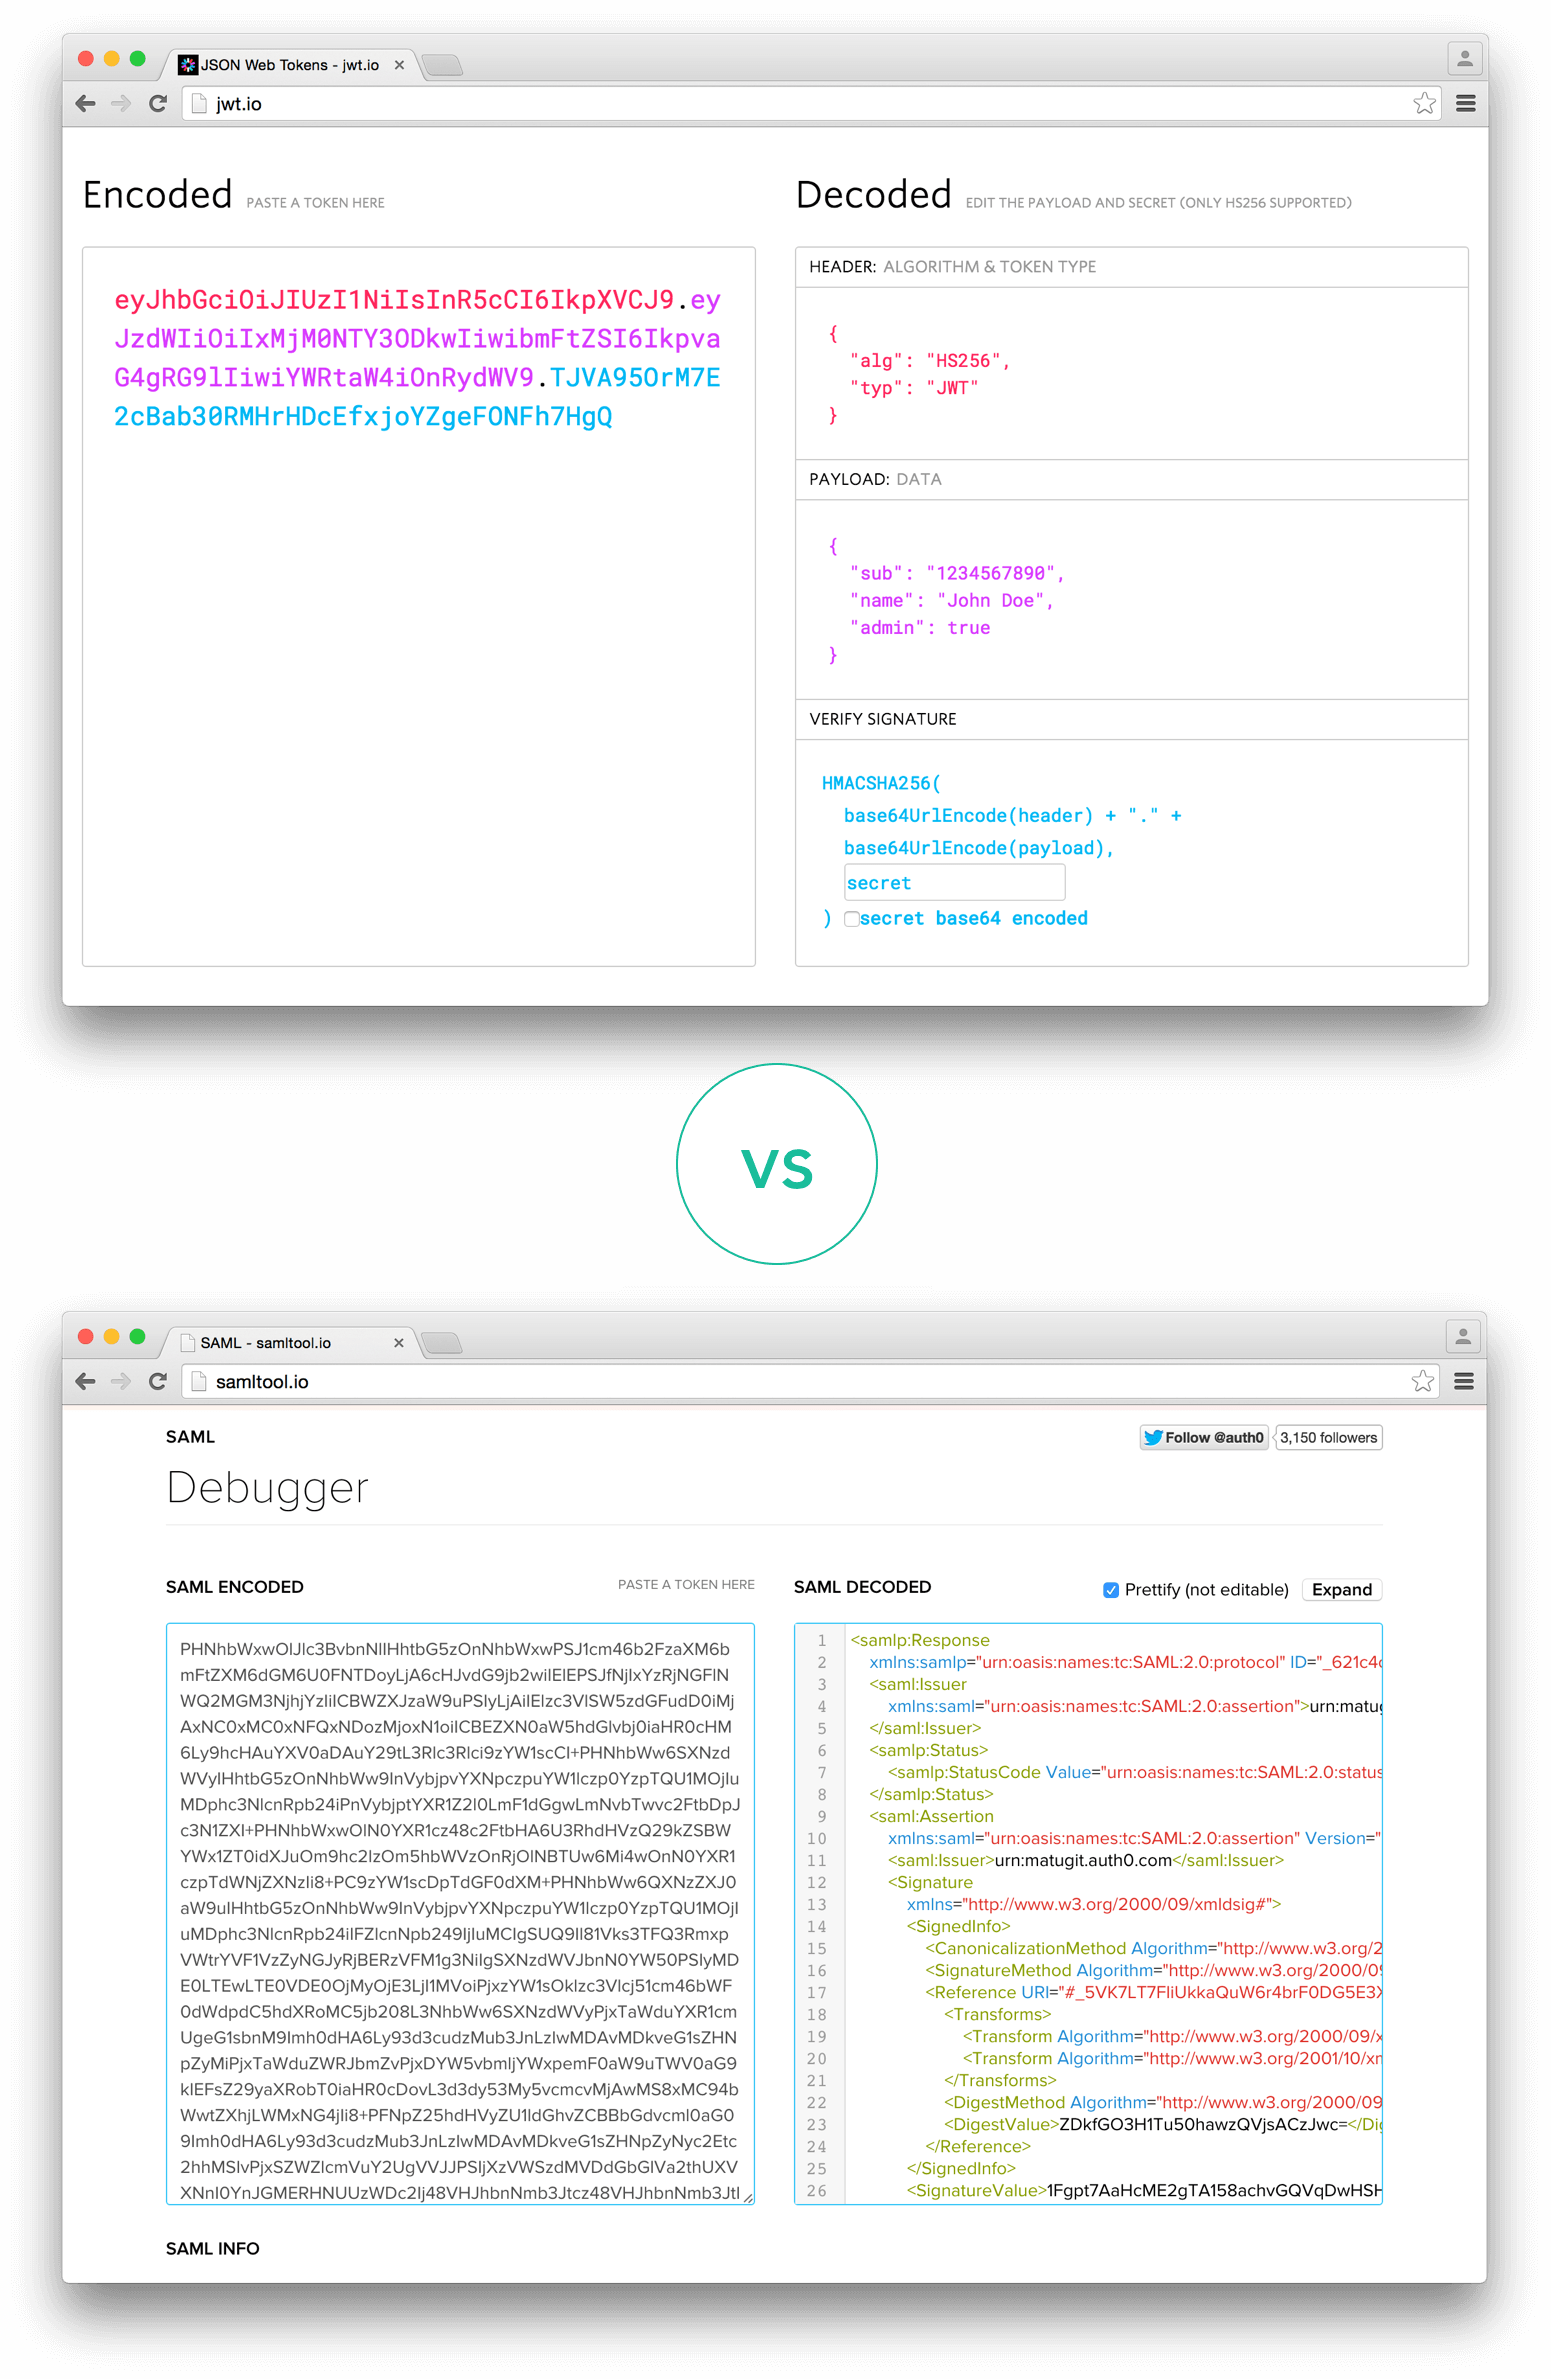
Let’s talk about the benefits of JSON Web Tokens (JWT) when compared to Simple Web Tokens (SWT) and Security Assertion Markup Language Tokens (SAML).
As JSON is less verbose than XML, when it is encoded its size is also smaller, making JWT more compact than SAML. This makes JWT a good choice to be passed in HTML and HTTP environments.
Security-wise, SWT can only be symmetrically signed by a shared secret using the HMAC algorithm. However, JWT and SAML tokens can use a public/private key pair in the form of a X.509 certificate for signing. Signing XML with XML Digital Signature without introducing obscure security holes is very difficult when compared to the simplicity of signing JSON.
JSON parsers are common in most programming languages because they map directly to objects. Conversely, XML doesn’t have a natural document-to-object mapping. This makes it easier to work with JWT than SAML assertions.
Regarding usage, JWT is used at Internet scale. This highlights the ease of client-side processing of the JSON Web token on multiple platforms, especially mobile.
If you want to read more about JSON Web Tokens and even start using them to perform authentication in your own applications, browse to the JSON Web Token landing page at Auth0.
Creating a JWT
To create a JWT, the following steps are performed. The order of the steps is not significant in cases where there are no dependencies between the inputs and outputs of the steps.
-
Create a JWT Claims Set containing the desired claims. Note that whitespace is explicitly allowed in the representation and no canonicalization need be performed before encoding.
-
Let the Message be the octets of the UTF-8 representation of the JWT Claims Set.
-
Create a JOSE Header containing the desired set of Header Parameters. The JWT MUST conform to either the [JWS] or [JWE] specification. Note that whitespace is explicitly allowed in the representation and no canonicalization need be performed before encoding.
-
Depending upon whether the JWT is a JWS or JWE, there are two cases:
-
If the JWT is a JWS (JSON Web Signature), create a JWS using the Message as the JWS Payload; all steps specified in [JWS] for creating a JWS MUST be followed.
-
Else, if the JWT is a JWE (JSON Web Encryption), create a JWE using the Message as the plaintext for the JWE; all steps specified in [JWE] for creating a JWE MUST be followed.
-
-
If a nested signing or encryption operation will be performed, let the Message be the JWS or JWE, and return to Step 3, using a cty (content type) value of JWT in the new JOSE Header created in that step.
-
Otherwise, let the resulting JWT be the JWS or JWE.
Validating a JWT
When validating a JWT, the following steps are performed. The order of the steps is not significant in cases where there are no dependencies between the inputs and outputs of the steps. If any of the listed steps fail, then the JWT MUST be rejected – that is, treated by the application as an invalid input.
-
Verify that the JWT contains at least one period (‘.’) character.
-
Let the Encoded JOSE Header be the portion of the JWT before the first period (‘.’) character.
-
Base64url decode the Encoded JOSE Header following the restriction that no line breaks, whitespace, or other additional characters have been used.
-
Verify that the resulting octet sequence is a UTF-8-encoded representation of a completely valid JSON object conforming to RFC 7159 [RFC7159]; let the JOSE Header be this JSON object.
-
Verify that the resulting JOSE Header includes only parameters and values whose syntax and semantics are both understood and supported or that are specified as being ignored when not understood.
-
Determine whether the JWT is a JWS or a JWE using any of the methods described in Section 9 of [JWE].
-
Depending upon whether the JWT is a JWS or JWE, there are two cases:
-
If the JWT is a JWS, follow the steps specified in [JWS] for validating a JWS. Let the Message be the result of base64url decoding the JWS Payload.
-
Else, if the JWT is a JWE, follow the steps specified in [JWE] for validating a JWE. Let the Message be the resulting plaintext.
-
-
If the JOSE Header contains a cty (content type) value of JWT, then the Message is a JWT that was the subject of nested signing or encryption operations. In this case, return to Step 1, using the Message as the JWT.
-
Otherwise, base64url decode the Message following the restriction that no line breaks, whitespace, or other additional characters have been used.
-
Verify that the resulting octet sequence is a UTF-8-encoded representation of a completely valid JSON object conforming to RFC 7159 [RFC7159]; let the JWT Claims Set be this JSON object.
Finally, note that it is an application decision which algorithms may be used in a given context. Even if a JWT can be successfully validated, unless the algorithms used in the JWT are acceptable to the application, it SHOULD reject the JWT.
Security Considerations
In addition to the all the security considerations discussed in OAuth 2.0 [RFC6819], the security considerations in [RFC7515], [RFC7516], and [RFC7518] needs to be considered. Also, there are several academic papers such as [BASIN] that provide useful insight into the security properties of protocols like OAuth.
In consideration of the above, this document advises taking the following security considerations into account.
1. Choice of Algorithms
When sending the authorization request object through “request” parameter, it MUST either be signed using JWS [RFC7515] or signed then encrypted using JWS [RFC7515] and JWE [RFC7516] respectively, with then considered appropriate algorithms.
2. Request Source Authentication
The source of the Authorization Request MUST always be verified. There are several ways to do it in this specification.
-
(a) Verifying the JWS Signature of the Request Object.
-
(b) Verifying that the symmetric key for the JWE encryption is the correct one if the JWE is using symmetric encryption.
-
(c) Verifying the TLS Server Identity of the Request Object URI. In this case, the Authorization Server MUST know out-of-band that the Client uses Request Object URI and only the Client is covered by the TLS certificate. In general, it is not a reliable method.
-
(d) When Authorization Server is providing an endpoint that provides a Request Object URI in exchange for a Request Object, the Authorization Server MUST perform Client Authentication to accept the Request Object and bind the Client Identifier to the Request Object URI it is providing. Since Request Object URI can be replayed, the lifetime of the Request Object URI (eg:”https://tfp.example.org/request.jwt/GkurKxf5T0Y-mnPFCHqWOMiZi4VS138cQO_V7PZHAdM”) MUST be short and preferably one-time use. The entropy of the Request Object URI MUST be sufficiently large. The adequate shortness of the validity and the entropy of the Request Object URI depends on the risk calculation based on the value of the resource being protected. A general guidance for the validity time would be less than a minute and the Request Object URI is to include a cryptographic random value of 128bit or more at the time of the writing of this specification.
-
(e) When a third party, such as a Trust Framework Provider(TFP), provides an endpoint that provides a Request Object URI in exchange for a Request Object. The same requirements as (b) and (c) above apply. In addition, the Authorization Server MUST know out-of-band that the Client utilizes the Trust Framework Operator and the Authorization Server MUST be a member of that trust framework so that it can trust the TFP.
3. Explicit Endpoints
Although this specification does not require them, research such as [BASIN] points out that it is a good practice to explicitly state the intended interaction endpoints and the message position in the sequence in a tamper evident manner so that the intent of the initiator is unambiguous. The following endpoints defined in [RFC6749], [RFC6750], and [RFC8414] are RECOMMENDED by this specification to use this practice:
-
(a) Protected Resources (“protected_resources”)
-
(b) Authorization Endpoint (“authorization_endpoint”)
-
(c) Redirection URI (“redirect_uri”)
-
(d) Token Endpoint (“token_endpoint”)
Further, if dynamic discovery is used, then this practice also applies to the discovery related endpoints.
In [RFC6749], while Redirection URI is included in the Authorization Request, others are not. As a result, the same applies to Authorization Request Object.
The lack of the link among those endpoints are cited as the cause of Cross-Phase Attacks introduced in [FETT]. An extension specification should be created as a measure to address the risk.
4. Risks Associated with request_uri
The introduction of “request_uri” introduces several attack possibilities. Consult the security considerations in Section 7 of RFC3986 [RFC3986] for more information regarding risks associated with URIs.
- 4.1 DDoS Attack on the Authorization Server
A set of malicious client can launch a DoS attack to the authorization server by pointing the “request_uri” to a uri that returns extremely large content or extremely slow to respond. Under such an attack, the server may use up its resource and start failing.
Similarly, a malicious client can specify the “request_uri” value that itself points to an authorization request URI that uses “request_uri” to cause the recursive lookup.
To prevent such attack to succeed, the server should
-
(a) check that the value of “request_uri” parameter does not point to an unexpected location,
-
(b) check the content type of the response is “application/ oauth.authz.req+jwt”,
-
(c) implement a time-out for obtaining the content of “request_uri”,
-
(d) not perform recursive GET on the “request_uri”.
- 4.2 Request URI Rewrite
The value of “request_uri” is not signed thus it can be tampered by Man-in-the-browser attacker. Several attack possibilities rise because of this, e.g.:
-
(a) attacker may create another file that the rewritten URI points to making it possible to request extra scope
-
(b) attacker launches a DoS attack to a victim site by setting the value of “request_uri” to be that of the victim.
To prevent such attack to succeed, the server should
-
(a) check that the value of “request_uri” parameter does not point to an unexpected location,
-
(b) check the content type of the response is “application/ oauth.authz.req+jwt”
-
(c) implement a time-out for obtaining the content of “request_uri”.